Showing posts with label Windows 7. Show all posts

Monday, 17 September 2012

Block Unwanted Websites On Your PC

Windows uses  Hosts file to map hostnames to IP addresses. It basically tells your computer where to look for a certain website.When you type an address in your web browser it first checks the Hosts file for redirection information,if no record about a website is found, it opens a website for you.

How You Can Block A Website On Windows ?

Step 1
Go to Start button and in the search box type Notepad .


Step 2
Right click on Notepad and click Run as administrator. 


Select the File option from menu bar and click Open or use Ctrl + O .


Step 3
Now browse to host file which is located in  (C:\windows\system32\drivers\etc).The folder will be empty as it’s only showing *.txt files. In the bottom right of the folder click the drop-down menu and select > All Files


and double click on hosts to open it .


Step 4
Now you will see a new notepad window on your screen containing some obscure information.


Just goto the last line of the file, hit the enter key and type the following
127.0.0.1 www.example.com
127.0.0.1 www.example1.com

For e.g :  if you want to block the websites like facebook or pogo games .You can simply replace the examples with the website names and  the Ip address will remains same for as many sites you want to block .

127.0.0.1 www.facebook.com
127.0.0.1 www.pogo.com


Step 5 
After editing , your hosts file look like this 


Just save the file and restart your web browser and the above mentioned websites will blocked . If you want to unblock the websites later just remove the created entry and save the file again.

Related : How To Redirect Websites In Windows 

How To Redirect Websites In Windows

Modifying HOSTS file in Windows presents another utility to users by Redirecting URLs to different Websites. Let's say opening www.google.com leads to www.facebook.com .The following steps will guide you to this simple Windows trick

Step 1
Go to Start button and in the search box type Notepad .


Step 2
Right click on Notepad and click Run as administrator. 


Select the File option from menu bar and click Open or use Ctrl + O .


Step 3
Now browse to host file which is located in  (C:\windows\system32\drivers\etc).The folder will be empty as it’s only showing *.txt files. In the bottom right of the folder click the drop-down menu and select > All Files


and double click on hosts to open it .


Step 4
Now you will see a new notepad window on your screen containing some obscure information.


Step 5
Here you have to keep two things in your mind :
  • The Name of the website you want to redirect.
  • The IP Address of the website you want to redirect to .

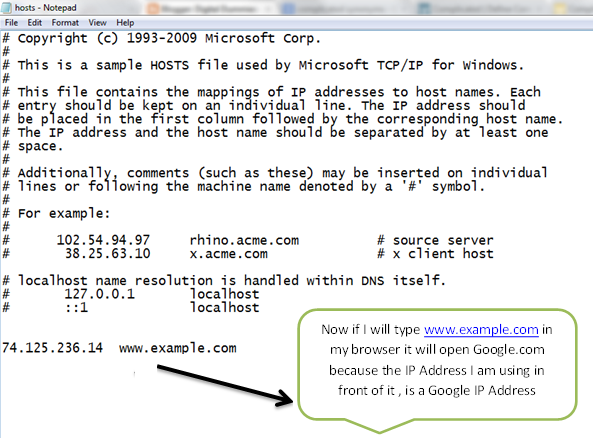
I think it looks so complicated. Lets take an eg: if i want to redirect the address example.com To Google.com , i have to create an entry in the hosts file of windows with IP Address of Google.com its look something like this

74.125.236.14  www.example.com


So if you want to Redirect any URL to other website.You must have the IP Address of that website. 

Related : How To Determine The IP Address Of Any Website

Step 6
After editing , your hosts file look like this 


                                                        Enter the correct IP Address in front of the URL and you are all set. Just save the file and restart your web browser and the above mentioned website will redirect to the IP Address you are using in front of it .


Friday, 24 August 2012

How To Change Default Shutdown Button In Windows 7

The default action for the Power button on the start menu in Windows 7 is shutdown.Most people never shutdown their computers so it would make more sense to change the shutdown button to Logoff or Restart.Windows 7 gives you the option to change the Shutdown button to five other actions i.e
  • Switch user
  • Log off
  • Lock
  • Restart
  • Sleep
Lets see how we can change this button to another option.

Step 1 :
Click on Start Button 


Step 2 :
Right click on the Shutdown button and click on Properties 


OR Right click on Windows Taskbar and Select Properties .


Step 3 :

It will open the Taskbar and Start Menu Properties page .Select the Start Menu Tab.


Step 4 :
Besides the Power Button Action click on the drop down list and it will show you the list of optins which you can select in place of Shutdown.


Step 5 :
Make your selection and click Apply > OK to confirm the changes and you are all set .


Thursday, 16 August 2012

How To Schedule Disk Defragmentation in Windows 7

What Is Disk Defragmentation ?
Disk Defragmenter is a utility in Microsoft Windows  that rearranges the data on your hard disk and reunites fragmented files. Defragging takes fragments of data and puts them in a nice order, so your hard drive doesn't have to work hard to find the photos and music which could be stored in thousand different areas on your disc.


How To Use Disk Defragmentation In Windows ?
Open the Start Menu and Go into All Programs -> Accessories -> System Tools and Click on Disk Defragmenter or type dfrgui into the search line and press Enter.


In the Disk Defragmenter dialog box, click the drives that you want to defragment, and then click the Defragment Disk button. It will first Analyze your disk and then start defragmentation.


Depending on the size of your hard disk , your processor speed, and the amount of fragmentation, it will take from several minutes to few hours.


How To Schedule Disk Defragmentation In Windows 7 ?
You can also schedule the Disk Defragmenter to run automatically.Click "Configure schedule", authenticate if necessary. 


A screen appears showing  Windows 7 ordinarily defrags your disk every Wednesday night at 1:00 a.m. You can use the pop-up menu here to specify a Weekly, Daily or Monthly schedule , complete the Day and Time options.


Select the disk you want to Defrag in disks options and Click OK to confirm the changes.


Monday, 30 July 2012

How To Add Additional Parental Controls ?

Turn On Additional Controls like  Web  Filtering, Activity Reporting 
You can restrict the websites that children can visit, make sure children only visit age-appropriate websites. Windows Live Family Safety is a free program which helps you to manage which websites your children see and who they can talk to online. It also provides helpful, easy-to-read reports of their online activity.

Step 1:
Select the Windows Live Family Safety in additional control and click on to the standard user account that you want to set Parental Controls for.


Step 2 :
After selecting the account you will be redirect to Windows Live Page and it will ask you for Login. If you dont have a windows live account  please create the new account by clicking on to the Sign Up or login with your Hotmail credentials and click on Sign In .


Step 3 :
A page appears with options to select from several preferences like


Web filtering
Select Turn on web filtering and then move the slider to select a filtering level.There are various filtering level available :


Web filtering Lists
Web filtering lists let you allow or block the websites for your children.


Activity Reporting 
Activity reporting provide you the reports of your children activity while using the computer. Select Turn on activity reporting to get the reports .


Requests 
Here you can see the blocked Web sites your child wants you to override. Check out the requested site by clicking the link in the “Web address” column. If it seems harmless enough, use the pop-up menu in the Response column to choose “Approve for this account only” (just this kid) or “Approve for all accounts” (all kids). If not, then click Deny.


Time Limits 
Time Limits lets you set the times and days of the week that your kids can use the Internet. You might, for example, decide to keep your kids off the PC on school nights. When you click “Time limits,” a calendar opens where you can block times by selecting them.

Game Restriction
Prevents your youngsters from playing games altogether, or lets you specify which kinds of games they can play.


App Restrictions 
You can prevent children from running programs that you don't want them to run. Click Turn on app restrictions and select the programs that you want to Block.


Sunday, 22 July 2012

How To Setup Parental Controls In Windows 7

Parental controls help you to manage how your children use the computer. You can use Parental Controls to set limits on the hours that children can use the computer, the types of games they can play, and programs they can run. It can also help you to manage which websites your children can see and also provides helpful, easy-to-read reports of their online activity.

How To Setup Parental Controls ?
While setting up the parental controls please make sure  that the user you want to set up Parental Controls for, has a standard user account. Parental Controls can be applied only to standard user accounts.

Step 1
Click the Start button and go to Control Panel .


Step 2 
Select Set up parental controls for any user listed under User Accounts and Family Safety. If you're prompted for an administrator password or confirmation, type the password or provide confirmation.


Step 3
You will see a screen that lists all of you users accounts. Please select the standard user account that you want to set Parental Controls for.


Step 4 
You can limit the time, games, programs by doing simple changes in the settings .Click On, enforce current settings under Parental Controls. Once you've turned on Parental Controls, you can adjust the following settings :


Time limits 
You can setup time limit to control when your children are allowed to log on to the computer. You can set different log on hours for every day of the week. If they're logged on when their allotted time ends, they'll be automatically logged off.Click on Time Limits and drag the hours you want to block or allow.


Games
You can prevent your children from playing games you don't want them to play.Click on Games 


  • Set game rating : It helps you to block(or allow) games by rating and content type. 
  • Block or Allow specific games :It helps you to block(or allow) specific games.


Allow and block Specific Programs
You can prevent children from running programs that you don't want them to run. Click Person's name‌ can only use the programs I allow and select the programs that you want to allow. If the program doesn't appear in the list, click Browse to locate the program.


You can restrict the websites that children can visit, and also manage which websites your children see and who they can talk to online. It also provides helpful, easy-to-read reports of their online activity.Read More about  How To Add Additional Parental Controls ?

Sunday, 8 January 2012

How To Reset Internet Explorer To Fix Problems


In a case, you have an IE problem such as IE crashing, freezing , slow browsing . By resetting Internet Explorer settings, you can return Internet Explorer to the state it was in when it was first installed on your computer. To save time, you can reset all of the IE settings rather than trying to troubleshoot individual areas.

Reset IE To Default :

  • Open the Internet Explorer and click on Tools and select Internet Options .
  • It will open the Internet Option .
  • Select the Advanced Tab .

  • Click on to the Reset button and it will open the Reset Internet Explorer Settings.If you don't want to lose your personal settings like your homepage, search provider, passwords, history…etc.Uncheck the box Delete Personal Settings and hit Reset .
  • Now settings will start to reset , when it’s finished close out the message box and Restart the Internet Explorer for changes .

Related Posts Plugin for WordPress, Blogger...
Follow Us